The whole premise for this Max for Live device was as a “proof-of-concept”, a means to showcase a few of the objects and possibilities that came along with the release of Max 8.3. As some of you know, I first shared this in mid-May ’22, and due to some unforeseen circumstances, I got a little sidetracked. It would have made more sense then, but I’ve still been getting messages about it, so what the heck! I’m releasing it for the sake of shared learning.
The intention here-
- Learn a few new things about Max 8.3
- Make some music with it and share (if you share, please tag me/this walk-through)
- Modify the heck out of it and make iterations of it for yourself (consider sharing these back with the community)
- Have fun 🙂
Download Lil Ratched Doodad Here
Sync
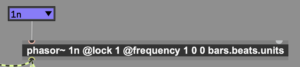 This whole MFL device starts with a
 [phasor~ 1n @lock 1 @frequency 1 0 0 bars.beats.units] These settings mean the phasor~ is generating an audio ramp in sync with Live’s transport regardless of the tempo at 1n. i.e., when set to 1n, the phasor ramp takes 1-bar to ramp from 0. to 1. — If it were set to 4n it would ramp from 0. to 1. four times per bar.
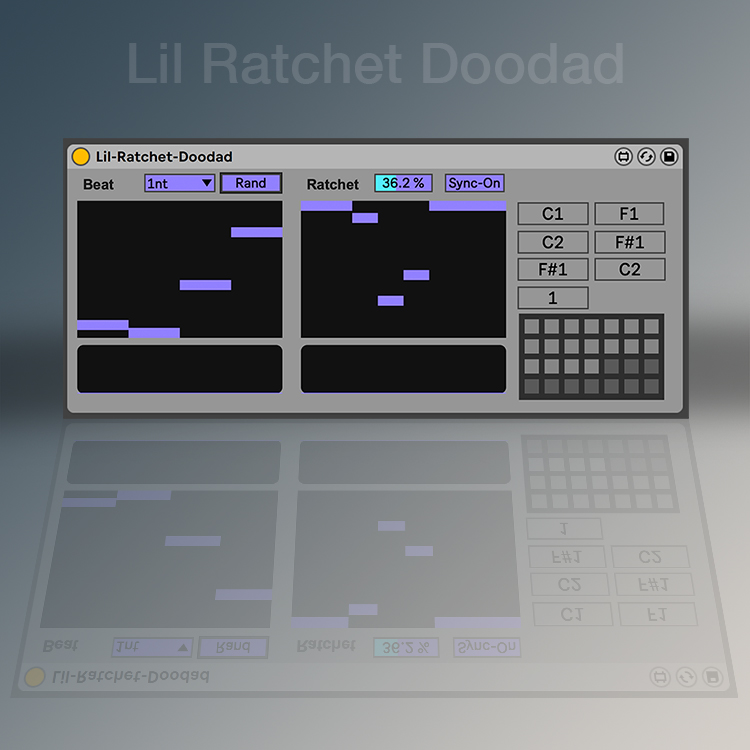
Beat (left-side of MFL Device)
 Next, we have our first new Max 8.3 object
 [what~] what does what do!? [what~] does a great job of replacing the infamous delta~/<~/edge~ combo, and brings a new attribute that can be set to on/off @syncupdate. Unlike the delta~/<~/edge~, which can only detect one signal crossing per phasor ramp, [what~] can receive a list of values between 0. and 1. and generates a 1-sample pulse each time the phasor ramp crosses one of those values, meaning multiple pulses per ramp. In addition, the @syncupdate 1 attribute allows any incoming list of crossing point values to only update when the phasor ramp starts from 0. [@syncupdate 0] immediately updates regardless of the phase ramp position — this makes [what~] very powerful & flexible for wild synchronous beat making.
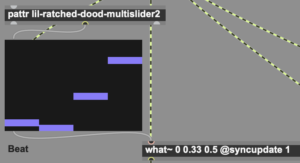
This [multislider] attached to [what~] generates crossing-point values between 0. to 1. – these are the points where [what~] will generate a 1-sample pulse when the incoming phase ramp passes the set values. In this case, @syncupdate is set to 1; therefore, when changing the values in the [multislider] they will only update when the incoming [phasor~] ramp hits zero, keeping everything nice and tight, including beat/sequence changes.
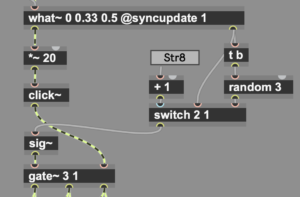
After [what~] receives the list from the [multislider] it generates pulses at each crossing-point in the list and sends those pulses out the left outlet of [what~] – this can be used as your trigger sequence. Additionally, [what~] has a useful index count coming out of its right outlet; if the list of values is 4 (for example, 0. .25 .5 .75) it will give you an index for each crossing point as an integer. i.e 0./0 – .25/1 – .5/2 – .75/3 – When the [switch] is set to Str8 it sequences the outputs of the trigs from [gate~ 3 1] in the same order as the crossing points set by the multislider, meaning the pulses generated by [what~] are passed to the midi note generated in the same sequence as set by the [multislider] from L to R. When the button is set to Rand the switch stops the [what~] index going out in order and instead as each index point generates a random value between 0 > 2. This random value modulates the output of the [gate~ 3 1], allowing us to randomize the pulse out of [what~] and maintain the timing by jumbling [gate~] output ordering.
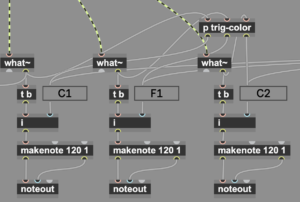
Here we’re just generating midi notes when a pulse comes out of the [gate~ 3 1] from above.[what~] in this case with no settings, it’s just being super lazy and translating the pulse from the [gate~] to a trigger in order to make the midi note.
[t b] changes the [what~] 0 index to a bang, and that then triggers the [int] which is storing the set midi note, the midi note number is sent out of [i] when it receives the bang and tells [makenote] to make a note with that midi note value. [makenote] makes the note (LoL) and sends it into [noteout] which sends it back into Ableton Live.
Ratchet (right-side of MFL Device)
Ok, this ratchet section is a doozy to explain. Hopefully, the numbers help.
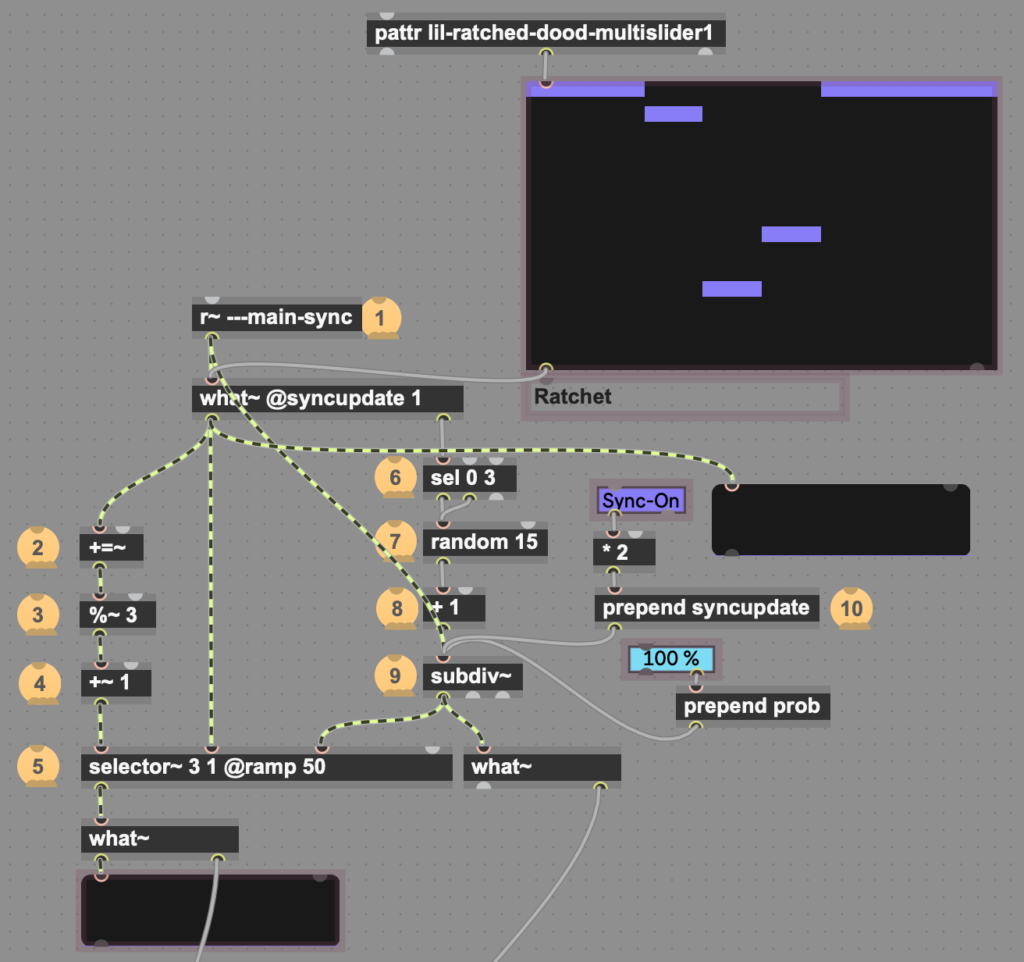
1) is [r~ ---main-sync] this is just a ‘copy’ of our main phasor that is synced to Ableton Live’s transport; I use a receive here so I can get rid of a number of patch cables being drawn across the device. This runs into a [what~ @syncupdate 1], doing the same as the beat section. It receives a list of cross-points from the [multislider] from which it will generate 1-sample pulses each time the phasor ramp crosses each point from the incoming list. The three dashes — at the beginning of ---main-sync switches to a unique number i.e. 004main-sync on instantiation. This ensures that you can have multiple copies of Lil Ratchet Doodad in multiple tracks running at different rates.
2) [+=~] is a signal accumulator, it just counts by 1 each time it receives a pulse from [what~] it sends the count into [%]
3) [%] modulo which divides two signals and outputs the remainder. In this case, it gives us a count from 0 to 2 (0, 1, 2) over-and-over in sync with the incoming pulses from [what~]
4) we add 1 [+~ 1] so that our count is 1, 2, 3
5) This count runs into [selector~] which sequences between the second, third, and fourth inlets. When the 2nd inlet is open the ratchet is passed through as set by the [multislider] when the 3rd inlet is open the output from the [subdiv~] is passed to the outlet of [selector~] and when the 4th inlet of [selector~] is open, nothing passed out the output, aka this is a skip/mute.
[selector~] also has a new Max 8.3 attribute set @ramp 50 This adds a 50ms crossfade between the opening and closing of each of the inlets, an excellent way to ensure clickless switching.
6) Like with the beat side, [sel 0 3] is taking the index output from [what~] by only selecting and sending triggers out for 0 & 3 we are only producing bangs 25% of the time for each phasor~ ramp and only for crossing points 1 and 3 from the list (index points 0 & 2)
7) Then with the trigger bangs from [sel 0 3], we generate a number between 0 & 14 with [random 15]
8) With [+ 1] we add 1 to the random number coming out of [random 15]
9) [subdiv~] a new object to Max 8.3 that can perfectly sync and subdivide an incoming phasor~, this [subdiv~] is receiving the main synced phasor~. The random input from (8) is subdividing the incoming synced phasor by different random amounts.
10) We have [Sync-on / Sync-off] button set to decide if we want these random subdivisions to happen immediately when the number if received into [subdiv~] or to wait until subdiv~ reaches zero before updating and subdividing by the new number. We also have a probability percentage we can set deciding whether to play the subdivided ramp (ratchet) or skip it.
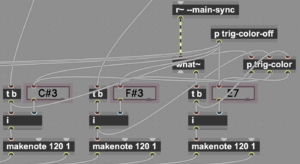 These all run into a three-note-making setting via
 [what~]‘s that just translates the ratchet pulses into trigger bangs in order to fire off notes the same way at the beat section.
Note
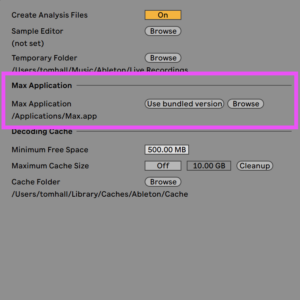
For this device to work, you need to be using Max 8.3 or greater. You will need to ensure that your Ableton Live copy is set to use Max 8.3 and not the bundled version.
Download the latest version of Max Here
Once installed, go to your Ableton Live preferences and point Live to the new version of Max installed. Restart Live, and you will be able to open this Live set and use Lil Ratchet Doodad.